Tuesday 31 December 2013

All the glitters new years nails!!


So it's New Years! I thought I would use all the glitters and this is the result!!! Happy New Years Nailsketeers!!!! 

-Faye xo

Tuesday 24 December 2013

Snowy christmas-y scene with cheeky rudolph


This is a little more of a complicated design which will take a bit more time to do, but the final product is just stunning! (a compliment I got today). But the amount of detail you include is completely up to you. 


To start I painted my nails a solid blue, I chose this blue because it looked like the sky on a winters evening. 

I then used a white shimmery striper to lay snow at the bottom of the nail. To make it look more like freshly fallen snow, I feathered the edge of the snow instead of having a harsh straight line. 


To make the trees  I used a green shimmery colour - by using a shimmery green it creates highlights and lowlights which look like individual leaves. I like detail and depth in a nail design, as you can probably tell.
Start by drawing a vertical line where you want to tree to be using a art brush and then dab the polish on starting from the bottom and working up to the top. As you get further up, make the dab smaller and smaller to create the rough triangle shape. 

To make the Rudolph, I used a medium brown and a dotting tool. I used little dabs to make the two legs first, then the body, and finally the head and ears. Having a picture of a reindeer to look at while you can do this may help get a better result. Because as much as you think you know what a reindeer looks like, when you come to painting one on your nails, you may forget the details. Its very odd, but it happened to me!

Remember to include the antlers, I used black for them so they would stand out against the blue background. And remember a red nose to make the reindeer Rudolph, I used a red glitter polish.

Next I used the largest dotting tool I had to make the moon with a white polish. 
To create the craters, I mixed white and black polish to make a light grey. I then dabbed the grey on with a little art brush. 

The final step was to make it snow!! I used my smallest dotting tool dipped in a white polish and then dotted snow flakes randomly over my nails. 


This have been the longest explanation I have ever done for the blog, but I think if you want to spend a bit more time on your nail design, it is definitely a design that anyone have a go at - even if you haven't done many detailed designs before. 


I hope you enjoy this design!


Merry Christmas!!!!


--Leah 


Monday 23 December 2013

Christmas presents

These nails celebrate the art of wrapping presents...

 I love to have loads of matching wrapping paper, ribbons, bows and tags! I can spend hours wrapping presents to get perfect and colour coordinated gift. But every year I seem to forget that the care and time I put in to lovingly wrapping gifts, will only be sabotaged by an eager and excited recipient on Christmas morning. 

To solve my short lived art dilemma, I decided to create some present designs on my nails that may last a little longer. 

Here we go...


I used five different base colours, you can used any colour that is Christmas-y or that tickles your fancy.

To give the design a little more detail - I put dots, stripes, little curled lines (like leopard print) and glitter on the base colours. Feel free to do any design you want, you could do diagonal lines or stars for instance. Make it your own!

Then I used a gold glittery striper to make the ribbon and bows. I painted them on slightly to one corner to give enough room for the bow to 'hang'. 

I love this design and will definitely be doing it again next year too!

--Leah

Snowflakess


This incredibly christmas-y design was created by painting my nail with medium blue base coat. I then used a white striper to make snowflakes all over my nail by connecting short lines together. Using short lines will make the snowflakes a lot easier to create. I did different sizes and patterns of snowflake to give it a a realistic look. 

On some of the snowflakes, I put a silver gem in the centre to make them a little more luxurious and fancy - It is Christmas after all!!

I then put glitter on the top of the design to make it feel more like an wintery evening snow shower. But I'm not sure which design I like better  - either with or without glitter.


I would recommend using a small glitter, instead of a larger glitter, to give the effect of snow falling in the background.


This design is a simple but a strikingly classic design which will not take very long to complete but will get you plenty of compliments.

Merry Christmas to all!

--Leah

Sunday 22 December 2013

Reindeer nails!

So this was one of last years designs for me, but we didn't have the blog then so I thought I loved it so much I'd share it now :)


These gorgeous little reindeer were done on a white background with Barry M Mushroom colour applied with dotting tools, the noses, antlers and eyes were all done with dotting tools too! I remember enjoying this design a lot, and getting lots of compliments on it, it looks very effective and quite complicated to do, but it's actually quite simple, it's pretty simple shapes throughout that dotting tools can easily create. This design was finished with a gloss top coat, but a think a matte would look great creating a more cartoon feel to the design!


I'd highly recommend doing the white 'shine' dot on the noses too as it really just adds that bit more glam! And don't forget to hunt out you red for Rudolph in the middle!

Have a go at your nails for this festive season!

~Heather


Friday 13 December 2013

Tis the Season!

First Christmas nails of the season! I'm sure there will be many to follow in the next few weeks so keep your eyes peeled!


The base colour was a lovely navy colour which I recieved in my Birchbox (my monthly beauty box - click the link for more info!)

The silver is my trusty Barry M silver foil. I created the dotty snowy effect with a dotting tool (very cheap on eBay).

I finished the whole thing off with a speedy top coat from Sally Hansen!

Hope you like, post us back with #Nailsketeers

- Faye

Saturday 23 November 2013

Geek alert! #dayofthedoctor

So for those of you who know... it is a very special day today! #dayofthedoctor! These aren't the neatest nails ever. But as I am a massive doctor who geek I just had to do these and I wanted to share them with you all.

The base colour is rimmel pro in 313 cocktail passion which I love using because of the shape of the brush and how quickly it drys.

To do the doctor who shapes I used my dotting tools and rimmel pro 431 stormy skies. Then the gold detailing with collection hot looks shimmy shake and a dotting tool once the shape was dry.

I added a bit of blue to the tardis shape on my middle finger and decided to go for purple detailing so it stood out. Then I outlined it with my barry m nail art pen to define the shape.

I'm sure I will do some more doctor who nails at some point and hopefully they will be neater and more planned out. If you have any ideas for other simple shapes I could do then let me know!!

Lots of geek love,
Abbi. Xx

Sunday 17 November 2013

Hunger Games Nails

The Hunger Games number 2 film is coming out and I am SOOOO excited! I absolutely LOVED the first film and will be going to see this one ASAP! I am SO excited that I just HAD to do some nails in tribute (eh, Tribute, eh!) to the woman herself, the Girl on Fire. 


Once again - gone for the accent nails, one of the mockingjay, above (Quite a difficult one to do on such a small canvas) and then of the flames below. 


Obviously topped it all off with a matte top coat - our fav Essie - Matte About You, and we are done!

Materials for the Mockingjay - Barry M limited edition gold from a few years ago, and then a few pound shop glitters for the fire nail!

Any other huge Hunger Games Fans out there?

For this movie they are releasing a Capitol Makeup Range which will include nail varnish and nail decals - SO excited!!!!

Here is the Trailer for your viewing enjoyment! And if you haven't watched (or read) the first one - DO IT NOW!!!!


- Faye. 

Thursday 31 October 2013

Ghost-ies!

Obviously halloween requires some halloween nails! So I tried to think of the most simple design possible (as I should have been doing work instead of doing nails!) And I ended up very happy with my ghost-ies as I think they are super cute.

I used good old barry m nail paint in mint green for the base colour, which is one of my faves atm, (not too summery and not too wintery!) And I used a French manicure white for the ghosts.


To draw the ghosts I did a blob with the brush then finished off using one of the bigger dotting tools. Then I used different sized dotting tools each time to do the eyes, as I wanted each ghost to be individual.

Now my nails are all ready for Halloween even if I haven't decided what I'm wearing yet! Looking forward to seeing everyone else's halloween nails!

Abbi. Xxxx

Halloween nails

So halloween's here: time to dress up your nails for those parties too!

Here's the design I'm wearing for my halloween, inspiration was from a simple google search of 'halloween nails' and a combination of a few ideas!


The whole design was done using only 4 colours, black white orange and a tiny bit of green, but I love how complex it looks regardless! As usual, a dotting tool was used to create the designs.

Send us a photo on our facebook page to share your spooky nails!

~Heather

Sunday 27 October 2013

Halloween Nails (that are suitable for work)

So, Halloween is almost upon us. And for my first Halloween nails of the week I have gone for a spooky subtle accent nail! 


I have done these halloween nails a bit unobtrusive so that I can wear them to work (I don't like to be too loud with the nails at work). So its just a bit of ombre in a Halloweeny purple and a wee picture of a witch, flying over a full moon! 


Materials used: Barry M - Berry, Barry M Gelly - Plum, 17 - Mini Skirt (White), Natural Collection - Sugar Mouse (the shimmer over the white of the moon) and the Barry M Nail art pen in Black. And of course Sally Hansen Base and Top Coats. 

Hope you like! Please show us your own Halloween Nails by using the hashtag #Nailsketeers!

Just on a side note, if you are looking for halloween nail ideas - One Nail to Rule them All has a few brilliant posts that I will certainly be trying out myself!! 

Happy Halloween Week,

- Faye

Saturday 19 October 2013

RSPB nails

I created this design to wear for a charity bike ride I took part in called NightRider, which is a 100km (65 mi) bike ride through London at night with hundreds of other cyclists also taking part - I started at midnight and finished at 5:35am. It was a tough challenge but totally worth the months of training and the tri-weekly onset of 'jelly legs'. 

I chose to raise money for the RSPB and saw the opportunity to create a totally cute design with birds (I LOVE BIRDS!). I didn't have much time to do this design between the training sessions and travelling to London, but here's how I did it. 

 These nails were created by firstly applying a blue base coat, which I let completely dry. I added the dots in a lighter blue and a light turquoise around the white letters that I free handed on with a striper. The starling (Yes, its a Starling not just any old bird!) on my thumb was made by dipping a little brush into black polish and adding little flecks/dabs of orange/gold to the wing to give a more detailed effect.


I decided against adding more detail such as eyes and more wing definition because I liked the way it looked and I had very little time free.

I finished the design with a matte top coat, I used Essie Matte For You, to give it a more cartoon-y feel - which I thought was much better than with a glossy top coat.

Hope you enjoy this design as much as I did. 

-Leah xx

Wednesday 16 October 2013

Cath Kidson Nails

As with many of my designs I got the idea for this one from The Nailasurus's blog (http://www.thenailasaurus.com/2013/09/cath-kidston-provence-rose-nail-art.html) I just loved the finish on this and how intricate it looked when it actually isn't too hard or take too long to do!


I started with a base of Barry M Blue, then once dry applied the Barry M white for the background of the flowers using a large dotting tool. The pinks were two from my extensive collection that are unbranded, I applied the lighter first, then the darker on top not in any particular pattern with a white splodge in the middle finishing it off. Using the smallest dotting tool I applied the green for the leaves. The hardest part was getting the dots around the edge consistent, take care when doing this! But as you can see mine aren't perfect, and I still got lots of compliments on them so it can't have been that bad! Finish it all off with a lovely top coat and you're ready to go!

If you have a go at any of our designs we'd love to see them! Find us on facebook http://www.facebook.com/thenailsketeers and let us see your creations!

~Heather

Monday 7 October 2013

Galaxy Nails

This week I attempted the fairly in and quite on trend galaxy nails! 


Here are all the colours i used, and i just used a cut up sponge as my main tool, a dotting tool for the smaller stars and a small brush for the bigger stars!


Then I had the mad and brilliant idea to put a matte top coat on them (Essie - matte about you), and it looks AMAZING!


Here is a picture of my right hand with the glossy top coat, I love my little fingers I think they look the best, and surprisingly, again, my right hand doesn't look half bad! (I am right handed and so they were done with the left hand!).


Hope you all like them, and I would recommend giving them a go, I have put it off as they look so hard but it is actually fairly easy to make these look great!

- Faye


Thursday 3 October 2013

Blue marble effect nails

Hello Nailsketeer followers,


These nails were inspired by the sea, and the ripples and waves of water that flow through seaweed and around rocks in tide pools. Poetic maybe, but an elegant and magical design definitely. 


To create this look I used all the blue colours I had. The colours ranged from light blue, through turquoise (light and dark) right to navy blue. 

I used the standards brushes which came with the polishes and dabbed colour in random dabs and swipes on to my nails. There was no set design instead I just wanted to create a mix of colours. 

I started with a clear base coat to protect the nail and give the design something to grip on to. I used a light blue base and waited for it to dry, then started with the darker colours moving through to the lighter ones. 

I purposely painted over some of the underneath colours to give depth to the design, and it gives each nail an original and slightly different design. 


To create the movement of the water I used a striper in a light metallic blue and starting at the bottom, I striped upwards creating a wave towards the top of my nail. In the picture you can see the wavy lines I made on my thumb nail the clearest. 

To finish the design I dabbed a blue and a turquoise glitter to add the sparkle and shine of the sun on the top of the water. 

This is one of my favourite designs but it did take a few trial runs to get the design how I wanted it. I found the addition of glitter is what made the design so beautiful and alluring. I got so many compliments with this design, even my male friends couldn't help but grab my fingers and look at them closely (little bit weird but hey, its a compliment).

Because it is mostly a 'dab here and a dab there' job, this design takes no time at all to do. Be as messy as you like but I bet they will always look magnificent! Have fun with these 

Leah xx

Sunday 29 September 2013

Barry M nail art pen


With the new(ish) arrival of the Barry M nail art pen, we thought we'd have a go a few designs and let you know what we though of it!


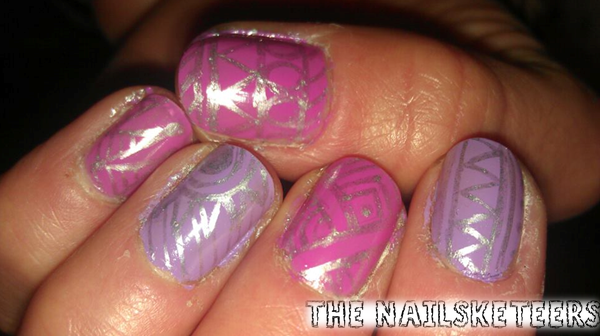
Heather - Here I went for the aztec look, this silver pen was brilliant to get intricate designs, I enjoyed trying to think them up. The problem came when I tried to do the same on my right hand, it didn't turn out quite to the same standard but I'm sure I'd get better with practice.

The pen was quite easy to use, took me a few minutes to get the pressure right (so make sure your base colour is completely dry first!) but you soon get the hang of it. With this design, I didn't get chance to put a top coat on (whoops!) and I found that because of that the pen design rubbed off within the next day or two so a top coat is a MUST! Personally for now I think I'll stick with the brush and varnish...but maybe I just need a few more tries with the pen and then I may grow to love it! 


Faye - This is my first attempt with the pen (my left hand only as my right looked like a child did it!) And I really love it! Again, I found it difficult to get the pressure right as Heather did, but after a few practice runs I think I got it! My only issue is that it is a lot harder to do your right hand (drawing with the left) but maybe that is something that will come with time? I'm not sure I would choose using the pen over a striping brush and polish but I would defs use it again for the more detailed designs!

Overall, we think it's a good handy tool to have in your nail kit, it just takes some time to get used to it!

Let us know what you think about the pens!

Tuesday 24 September 2013

Multi-coloured flowers

Hello nail art lovers! 

Another design created when glamping! Some multi-coloured flowers!

Started with some Barry M Lycée as my base, a favourite here at the nailsketeers, then used some other colours to do the petals and then did the black dots in the middle with the Barry M nail art pen. I think they turned out quite well, and they were a hit with Alison who is wearing them, who doesn't usually paint her nails! Have we got a convert!? 

Hope you liked it! The inspiration for this did come from another nail art blog, but it was so long ago I have forgotten which one!! Sorry if it is your design, get in contact and I will link to the original if it is!

Thanks!

- Faye

Thursday 19 September 2013

Gruffalo nails


"Silly old fox, doesn't he know...there's no such thing as a Gruffalo!"


I think Julia Donaldson is a great author (I am a self confessed big kid!) and Axel Scheffler a great illustrator and one of their best known stories is The Gruffalo! I wanted to try to create some nails from the story and they turned out better than I imagined they could!


To start this design I began with a white base coat on all nails then when dry, drew on the characters using an old liquid eyeliner which gave me the outline to then just colour in! To do the filling in, I used various colours from my extensive collection (I won't list them because that would be tooo much!) using dotting tools to apply. For the gruffalo himself I used a circular motion to apply the brown which meant it made a kind of textured effect that worked really well as his fur. The others had no special technique to apply it, but I did find that I needed to go over some of the outline once the colour was applied. A matte top coat finished it all off nicely.

I hope you enjoy this design as much as I enjoying creating and wearing it!

~ Heather

Sunday 15 September 2013

Banksy nails #2


I enjoyed the last Banksy nails I did so much (http://thenailsketeers.blogspot.co.uk/2013/07/banksy-nails.html) I had another look at his art work hoping to be inspired again and here it is!


The design was not the easiest to create and it didn't turn out as well as I imagined it would, but I think it was still quite effective. The yellow lines and flower I did using a striping brush. The flower I had imagined as more delicate I guess than it turned out, maybe the lines are too thick, or maybe my nails are just too small, who knows! The painter I created using dotting tools (I find dotters easier to control than brushes) and then finished it all off with a top coat.


I may try another Banksy design sometime, or maybe I'll have a look around for another artist to inspire me! Let me know if you have any ideas, I'd love some suggestions.

~ Heather

Friday 13 September 2013

Stripy Gradient

A design idea inspired by the Nailasaurus's post: http://www.thenailasaurus.com/2013/07/nonoo-resort-2014-inspired-nail-art.html


I loved the effect of the stripy gradient so thought I'd give it a go! As I'm not too quick with striping tape, I need more practice, I decided to only do the stripes on two nails on each hand. But turns out I like the contrast of the stripes from the other nails, which was even more exaggerated by doing the gradient in the opposite direction.

This design is quite technically challenging as it includes both the gradient technique and striping technique so I will explain both separately below. For the design I used Barry M's gelly colours Lychee and Plum.


* Gradient effect

To create this effect you firstly paint the whole nail the lighter colour, in this case, Barry M's gelly Lychee. Next you find a mixing plate (I use an old plastic lid) and put a blob of each colour next to each other. Grab a cocktail stick and where the two meet, mix them along the join. To apply the gradient to the nail use a sponge. I use a make up sponge (as in the picture), but even a clean washing up sponge would work (it would give a slightly more speckled finish but could add an interesting effect!). Put varnish on the sponge as it is on your palette then dab it onto your nail on top of the base colour. I find I need to top up the varnish on my palette quite regularly but you get into the swing of it. This technique takes time, but try not to rush it! If this isn't quite as clear as I thought there are some great gradient tutorials on the internet so just have a search and see what you find!


*Striping effect

For the stripes you need some striping tape (which is available very cheaply on ebay) and scissors. some people also use tweesers to handle the tape but I find it easy enough without. So to create the stripes, begin with a base coat of the lighter colour. Once this is dry put your pre cut strips of tape where you want the stripes to be, taking care to keep them parallel (if you want yours parallel!). Then, in the same way as the gradient technique, dab the gradient colour over the top of the stripes. Straight after this when varnish is still wet, take the tape off and there you have your design!

Finish each nail with a top coat once dry and tidy up using nail varnish remover and nail brush around your nail.

Any questions about these techniques or anything else just ask! I'll answer as best I can.

~Heather

Wednesday 4 September 2013

Strawberry Cheesecake

Using Barry M's Lychee and some pink and silver glitter I created this tasty design!


A pretty simple and quick design to do giving a lovely finish! The base coat of lychee was applied, and given time to dry. Next the pink glitter was applied with the brush in the bottle trying to get a fading effect by applying more just at the tip of the nail. Then one layer of silver glitter was put over the top to add another dimension to the colours! Finally, a gloss top coat was applied to finish the whole design.

When designs are this quick and easy why not give it a go!

~ Heather

Saturday 17 August 2013

A touch of class


 I have a family friend's wedding to go to in a couple of weeks so I thought it would be a good idea to practice my nails (just and excuse to paint my nails really!). I've decided these aren"t summery enough for the wedding, but I thought I'd share them with you anyway.

I decided to use a colour called ruby by champneys as that has class written all over it!

Then I used my dotting tools and my 17 crackle top coat to do the spots (as it was closest to the colour I wanted and I figured it wouldn't crackle too much!).


I was fairly pleased with the results and now I have to go somewhere classy to show them off!

Hope you like!!

Abbi. Xx

Thursday 15 August 2013

Sugar Spun Nails

I discovered this lovely creation on the web a while back but didn't get round to it until recently. I found a lovely tutorial on Nailasaurus' blog (http://www.thenailasaurus.com/2013/06/sugar-spun-nail-art-tutorial.html) which came in handy to try out this design!


I love the textured effect of these nails and have found it great fun wearing them!
 The downside though is that it took a long time to do...but I think every second was worth it.


To complete this bumpy design I used Barry M denim and La Femme Beauty Rickpink cream as base colours, I then used a top coat BEFORE the Barry M gold foil effects on top. This meant that once the gold was applied, as the Nailasaurus's tutorial suggests, I could leave it without a top coat so it was as textured as possible.


The technique used to do the sugar spun effect took some time and persistence. My technique wasn't as perfected as I wanted but I like how it ended up turning out. You can see the rounded blobs where I was trying to pull the varnish string across but accidentally touched my dotting tool to the nail, but fortunately, I did this enough times it looks like that's how it's meant to be!! This was my first time trying this technique so it goes to show you don't need to practice it lots before you can wear it out as even the mistakes look good with this effect!


There are some really cool sugar spun nails out there with combinations of colours too, I decided to stick to the one for my first go, but maybe I'll try two colours the next time I find enough time to tackle this technique again!

~ Heather

Tuesday 13 August 2013

Piggys!

Hi everyone,

I recently went glamping (glam camping) on a pig farm! It was lots of fun and we spent girly time doing a few nails! Inspired by the surroundings I did some piggy nails for my friend Helen! 


The base colour is Barry M Peach Melba with rimmel 60 secs Sundowner polish for the darker pink and then my models own dotters and stripers to do the details! 


I love doing fun characters but don't get to do them much due to work so when someone allows me to do fun things with their nails, I am on it! 

- Faye

Thursday 8 August 2013

Pink Retro Flowers


Pinky Pinky Pinky...

I bought this new pink recently and put it straight to use in this retro design. It kind of reminds me of the stunning vintage flowery dresses that I have seen from Forever 21. This is bright and eye catching colour but it has a creamy and smooth finish.
In other words - I LOVE THIS COLOUR!!


I used a darker pink colour to make two curls for the petals, then I used a peach polish to dab into the middle of each flower for the bud. To finish it off, I used a green to create a swirl at either side for the leaves. 


I chose to use colours that were all non shiney and non metallic to keep the design simple and uniform. 


Hope you guys like this summery design! There will be more summery designs coming soon so keep your eyeballs peeled! 

 -Leah

Friday 2 August 2013

Tie dye love

So I'm a little bit obsessed with tie-dye at the moment. And I just love these nails! I did them a while back but I have been a bit slacking with the post!


I started off with the light purple colour (that the lovely faye brought back from her travels in china!) as my base coat. I was fairly impressed with the quality considering it is not a make I know and I found the tiny brush it comes with very easy to use on my tiny nails!
Next I used a white from a french manicure set to do 3 stripes vertically on my nail, making each one shorter than the one before.
After that dried I used the dark purple (again from the lovely faye) to do the same thing again over the top of the white but just fractionally shorter.


I think this really easy design creates a brilliant effect and I love how it turned out!
Thank you very much to faye for the nail varnishes and the inspiration for this design!


Abbi. Xx

Tuesday 30 July 2013

Banksy Nails

I was looking for inspiration on the web and came across this lovely design on Smashley Sparkles blog which I thought I'd give it a go!


The design is a nail art version of Banksy's famous graffiti art the girl with the balloon. It was quite a fiddly design to do but surprisingly didn't take too long!


The design began with a base of Barry M white, I used Nina ultra pro red fox for the balloon and NYC black for the girl and string. The balloon was done with a dotting tool which allowed me to get a nice curve for the heart shape and the rest was completed with nail art brushes and Rimmel's Matte top coat.  It was hard to get the girl looking good, the black base was easy enough, but then deciding where the white highlights should go was hard. I'm still not sure I'm happy with how it ended up, but felt it was a good first attempt so thought I'd share the design anyway!


I really love creating designs with well known pictures or characters on them! 
Think I might try another Banksy creation on my nails in the near future (if I can find one that's not too complicated)...so watch this space!


~Heather


Thursday 25 July 2013

Summer Heat


In all this summer heat I thought I would try out my newest Poundshop purchase (TOP TIP! Sometimes Poundland have like actual good brands in them like Rimmel and Sally Hansen), my Rimmel 60 secs, Sun Downer. I wanted to do something like fire and fireworks and I have seen something like this in a blog recently but totally didn't favorite it and cant find it again? (if you know where i got it from please tell me and I will give credit where it is due!!).

To begin with it looked very messy and strange, but I think the gold sort of made it all come together and actually not look crap! I have actually included both my right and left hand in this post as they both look similarly ok!


2 coats Rimmel 60 Secs - Sun Downer (440) for the base coat.
Lots of different yellow and pink colours some of which are listed below -
Colour club - Reign in Spain (Bright Coral colour)
17 - Mellow Yellow (Yellowy gold colour)
Barry M - Peach Melba (Muted Coral)
Maybelline Colour Show - Electric Yellow
Barry M Limited Edition Gold (my fav nail polish ever)

Let me know thoughts, I'm still not sure if I love it!

Tuesday 23 July 2013

Waterfall


I saw Nailsaurus' waterfall posts and tutorial and thought they were so effective that I fancied giving it a go! 


So here is my offering...

To complete this design I used Barry M Lychee as a base then delved into my ever growing collection of colours to find about 5 different pinks and purples. The design is pretty simple to do, all you need is a tapered thin nail brush (I used one of about 1cm length) and you're off! When I was completing it, I thought my lines weren't straight enough and it was looking messy, but, I hope you agree, it turned out alright in the end!

This is a really cool effect that you can add your own touches to. It's not too clear on the picture, but I added a couple stripes of glitter on each nail too which finished it off nicely! But there are so many other possibilities and so many colour variations to try out so why not have a go!!


~Heather

Wednesday 17 July 2013

I'VE GONE DOTTY!!


DOTS DOTS AND MORE DOTS...

I love this design, but its not one for the fainthearted -

it took a lot of patience and concentration to keep every dot
the same size and equal distance apart. But I think it is
totally worth it because it looks stunning. 


I chose purple and gold because I had seen a fabulous dress
in the same colours and luurrrvved the combination! It think green and
gold would also work well together. 


I used a small dotting tool with a gold polish to create the
dots, then redotted each dot with a gold glitter to give it
an extra sparkle and shimmer. The purple I used was a Barry M
purple that had a slight shimmer in it (FACT: it was the
first nail varnish I ever bought) Both colours give a lovely
shine and make the design POP!


-- Leah