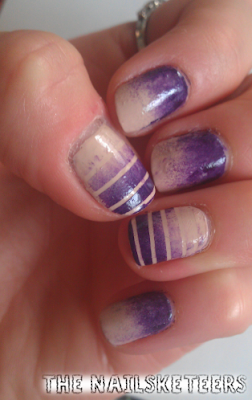
I loved the effect of the stripy gradient so thought I'd give it a go! As I'm not too quick with striping tape, I need more practice, I decided to only do the stripes on two nails on each hand. But turns out I like the contrast of the stripes from the other nails, which was even more exaggerated by doing the gradient in the opposite direction.
This design is quite technically challenging as it includes both the gradient technique and striping technique so I will explain both separately below. For the design I used Barry M's gelly colours Lychee and Plum.
* Gradient effect
To create this effect you firstly paint the whole nail the lighter colour, in this case, Barry M's gelly Lychee. Next you find a mixing plate (I use an old plastic lid) and put a blob of each colour next to each other. Grab a cocktail stick and where the two meet, mix them along the join. To apply the gradient to the nail use a sponge. I use a make up sponge (as in the picture), but even a clean washing up sponge would work (it would give a slightly more speckled finish but could add an interesting effect!). Put varnish on the sponge as it is on your palette then dab it onto your nail on top of the base colour. I find I need to top up the varnish on my palette quite regularly but you get into the swing of it. This technique takes time, but try not to rush it! If this isn't quite as clear as I thought there are some great gradient tutorials on the internet so just have a search and see what you find!

*Striping effect
For the stripes you need some striping tape (which is available very cheaply on ebay) and scissors. some people also use tweesers to handle the tape but I find it easy enough without. So to create the stripes, begin with a base coat of the lighter colour. Once this is dry put your pre cut strips of tape where you want the stripes to be, taking care to keep them parallel (if you want yours parallel!). Then, in the same way as the gradient technique, dab the gradient colour over the top of the stripes. Straight after this when varnish is still wet, take the tape off and there you have your design!
Finish each nail with a top coat once dry and tidy up using nail varnish remover and nail brush around your nail.
Any questions about these techniques or anything else just ask! I'll answer as best I can.
~Heather

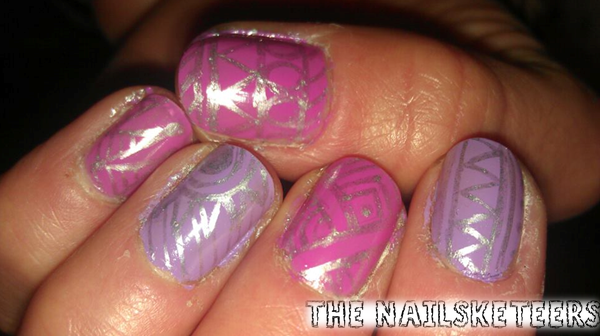 Heather - Here I went for the aztec look, this silver pen was brilliant to get intricate designs, I enjoyed trying to think them up. The problem came when I tried to do the same on my right hand, it didn't turn out quite to the same standard but I'm sure I'd get better with practice.